
This post details how to set up a Tomcat cluster for SpagoBI 5.1, building upon a previous guide for installing SpagoBI with MySQL (post). This configuration creates a redundant and highly available SpagoBI environment. We’ll be focusing on session-based clustering for its ease of implementation. Further reading on Tomcat Clustering can be found here.
Objective
The main goal is to establish a Tomcat cluster running SpagoBI, providing redundancy and failover capabilities. Session-based clustering ensures that user sessions are replicated across multiple Tomcat instances, so if one instance fails, users can continue working without losing their data.
Setup Overview
The architecture will consist of an Apache HTTP Server acting as a load balancer, distributing traffic across multiple Tomcat instances running SpagoBI. We’ll use Round Robin load balancing.
								 /--> spagobi-node-1
								/--> spagobi-node-2
	Apache (httpd)  -----[RoundRobin]----> spagobi-node-3
								\--> spagobi-node-4
								 \--> spagobi-node-5
Configuration Port Information for Each spagobi Instance
For this example, we’ll configure multiple Tomcat instances on a single server for demonstration purposes. Important: In a production environment, each Tomcat instance should reside on a separate physical server to achieve true redundancy and high availability. If each instance is on its own server, port distribution will not be needed.
Here’s the port configuration for each SpagoBI instance:
					SHUTDOWN	AJP		SSL
	spagobi-node-1	8005		8009	8443
	spagobi-node-2	8015		8019	8444
	spagobi-node-3	8025		8029	8445
	spagobi-node-4	8035		8039	8446
	spagobi-node-5	8045		8049	8447
Create Multiple Instances of the Existing Tomcat
We’ll create multiple Tomcat instances within the /opt directory. This allows us to manage each instance independently. Make sure you have Tomcat already installed before proceeding.
[ahmed@ahmed-server ~]# cd /opt/
[ahmed@ahmed-server opt]# cp -rf apache-tomcat-7.0.59 apache-tomcat-7.0.59-8019
[ahmed@ahmed-server opt]# cp -rf apache-tomcat-7.0.59 apache-tomcat-7.0.59-8029
[ahmed@ahmed-server opt]# cp -rf apache-tomcat-7.0.59 apache-tomcat-7.0.59-8039
[ahmed@ahmed-server opt]# cp -rf apache-tomcat-7.0.59 apache-tomcat-7.0.59-8049
[ahmed@ahmed-server opt]# mv apache-tomcat-7.0.59 apache-tomcat-7.0.59-8009
This creates five separate Tomcat instances, each named according to its AJP port. This naming convention simplifies identifying and managing each instance.
Updating server.xml File
The server.xml file is the core configuration file for Tomcat. We’ll modify it to configure each instance for clustering. We’ll start by updating the server.xml for the 8009 instance and then copy it to the other instances.
vim /opt/apache-tomcat-7.0.59-8009/conf/server.xml
Setting Up the SHUTDOWN Port
The SHUTDOWN port allows you to gracefully stop the Tomcat instance. Each instance needs a unique SHUTDOWN port.
spagobi-node-1	8005
spagobi-node-2	8015
spagobi-node-3	8025
spagobi-node-4	8035
spagobi-node-5	8045
Modify the <Server> tag in server.xml:
<Server port="8005" shutdown="SHUTDOWN">
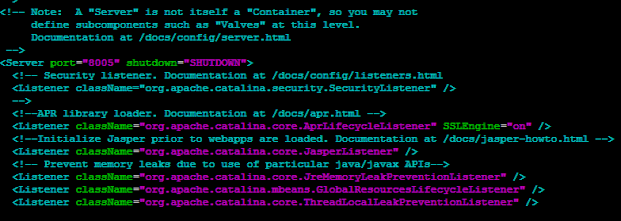
Commenting Out the HTTP Connector (Port 8080)
Since we’ll be using Apache HTTP Server as a front-end load balancer, we can disable the default HTTP connector on port 8080 in each Tomcat instance. This improves security by preventing direct access to the Tomcat instances.
<!--
<Connector executor="tomcatThreadPool"
           port="8080" protocol="HTTP/1.1"
           connectionTimeout="20000"
           redirectPort="8443" />
-->

Update spago_service_url and spago_host_url
These environment variables within the server.xml file define the base URLs for SpagoBI. We need to configure them to point to the load balancer’s address (Apache HTTP Server in this case), not directly to the individual Tomcat instances. This ensures all SpagoBI requests are routed through the load balancer.
Originally:
<Environment name="spagobi_service_url" type="java.lang.String"
                                        value="http://localhost:8080/SpagoBI"/>
<Environment name="spagobi_host_url" type="java.lang.String" value="http://localhost:8080"/>
Change to the IP address or hostname of the server hosting the Apache HTTP Server:
<Environment name="spagobi_service_url" type="java.lang.String" value="http://10.10.18.94/SpagoBI"/>
<Environment name="spago_host_url" type="java.lang.String" value="http://10.10.18.94"/>
If the Apache HTTP Server is on the same machine, you can use localhost.

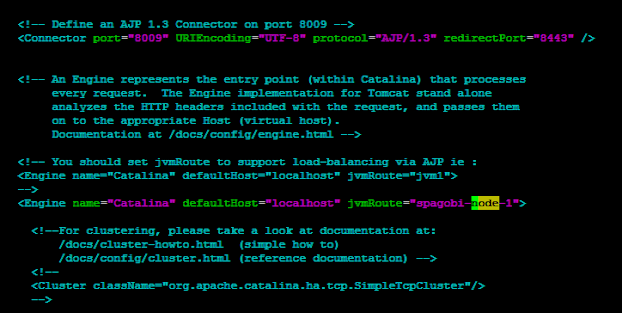
Setting AJP Port
The AJP connector facilitates communication between the Apache HTTP Server and the Tomcat instances. Each Tomcat instance must have a unique AJP port.
					AJP		SSL
	spagobi-node-1	8009	8443
	spagobi-node-2	8019	8444
	spagobi-node-3	8029	8445
	spagobi-node-4	8039	8446
	spagobi-node-5	8049	8447
For spagobi-node-1:
<Connector port="8009" URIEncoding="UTF-8" protocol="AJP/1.3" redirectPort="8443" />
Setting a Node Name (jvmRoute)
The jvmRoute attribute in the <Engine> tag uniquely identifies each Tomcat instance within the cluster. This is critical for session affinity (sticky sessions) when using the Apache HTTP Server’s mod_proxy_balancer.
<Engine name="Catalina" defaultHost="localhost" jvmRoute="spagobi-node-1">
Here’s how the server.xml looks with these changes:
Making Changes to the Rest of the server.xml Files
Now that we’ve configured the base server.xml (for instance 8009), we need to apply similar changes to the server.xml files for the other Tomcat instances.
First, copy the configured server.xml to all other instances:
cp /opt/apache-tomcat-7.0.59-8009/conf/server.xml /opt/apache-tomcat-7.0.59-80[1-4]9/conf/
cp /opt/apache-tomcat-7.0.59-8009/conf/server.xml /opt/apache-tomcat-7.0.59-80[123]9/conf/
cp /opt/apache-tomcat-7.0.59-8009/conf/server.xml /opt/apache-tomcat-7.0.59-8019/conf/
cp /opt/apache-tomcat-7.0.59-8009/conf/server.xml /opt/apache-tomcat-7.0.59-8029/conf/
Next, use sed (stream editor) to update the SHUTDOWN, AJP, SSL, and jvmRoute parameters in each server.xml file. This automates the process and reduces the risk of errors.
Update SHUTDOWN port on all the instances:
sed -i -- 's/8005/8015/g' /opt/apache-tomcat-7.0.59-8019/conf/server.xml
sed -i -- 's/8005/8025/g' /opt/apache-tomcat-7.0.59-8029/conf/server.xml
sed -i -- 's/8005/8035/g' /opt/apache-tomcat-7.0.59-8039/conf/server.xml
sed -i -- 's/8005/8045/g' /opt/apache-tomcat-7.0.59-8049/conf/server.xml
Update AJP port:
sed -i -- 's/8009/8049/g' /opt/apache-tomcat-7.0.59-8049/conf/server.xml
sed -i -- 's/8009/8039/g' /opt/apache-tomcat-7.0.59-8039/conf/server.xml
sed -i -- 's/8009/8029/g' /opt/apache-tomcat-7.0.59-8029/conf/server.xml
sed -i -- 's/8009/8019/g' /opt/apache-tomcat-7.0.59-8019/conf/server.xml
Update SSL port:
sed -i -- 's/8443/8444/g' /opt/apache-tomcat-7.0.59-8019/conf/server.xml
sed -i -- 's/8443/8445/g' /opt/apache-tomcat-7.0.59-8029/conf/server.xml
sed -i -- 's/8443/8446/g' /opt/apache-tomcat-7.0.59-8039/conf/server.xml
sed -i -- 's/8443/8447/g' /opt/apache-tomcat-7.0.59-8049/conf/server.xml
Update node-name (jvmRoute) for all instances:
sed -i -- 's/node-1/node-2/g' /opt/apache-tomcat-7.0.59-8019/conf/server.xml
sed -i -- 's/node-1/node-3/g' /opt/apache-tomcat-7.0.59-8029/conf/server.xml
sed -i -- 's/node-1/node-4/g' /opt/apache-tomcat-7.0.59-8039/conf/server.xml
sed -i -- 's/node-1/node-5/g' /opt/apache-tomcat-7.0.59-8049/conf/server.xml
Configuring httpd Server (Apache HTTP Server)
This section describes how to configure the Apache HTTP Server to act as a load balancer for the Tomcat cluster.
First, ensure that httpd is installed. If not, install it using:
sudo yum install httpd  # On CentOS/RHEL
# or
sudo apt-get install apache2 # On Debian/Ubuntu
Then, enable the necessary modules:
sudo httpd -M | grep proxy  #See if proxy modules are already enabled
sudo yum install mod_proxy_balancer mod_proxy_ajp # if not install them
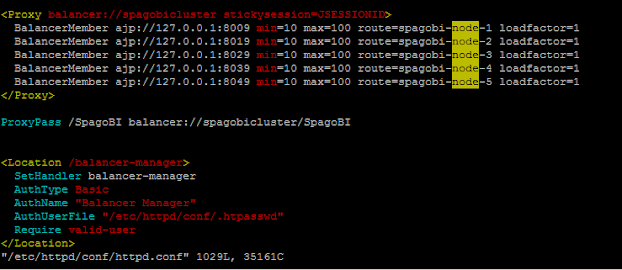
Add the following configuration to the end of your httpd.conf or apache2.conf file. The location of this file depends on your operating system and Apache configuration (e.g., /etc/httpd/conf/httpd.conf on CentOS/RHEL or /etc/apache2/apache2.conf on Debian/Ubuntu).
<Proxy balancer://spagobicluster stickysession=JSESSIONID>
  BalancerMember ajp://127.0.0.1:8009 min=10 max=100 route=spagobi-node-1 loadfactor=1
  BalancerMember ajp://127.0.0.1:8019 min=10 max=100 route=spagobi-node-2 loadfactor=1
  BalancerMember ajp://127.0.0.1:8029 min=10 max=100 route=spagobi-node-3 loadfactor=1
  BalancerMember ajp://127.0.0.1:8039 min=10 max=100 route=spagobi-node-4 loadfactor=1
  BalancerMember ajp://127.0.0.1:8049 min=10 max=100 route=spagobi-node-5 loadfactor=1
</Proxy>

ProxyPass / balancer://spagobicluster/
Explanation:
-
<Proxy balancer://spagobicluster stickysession=JSESSIONID>: Defines a proxy balancer named “spagobicluster” and enables sticky sessions based on theJSESSIONIDcookie. This ensures that a user’s session remains on the same Tomcat instance throughout their interaction. -
BalancerMember ajp://127.0.0.1:8009 ... route=spagobi-node-1: Defines each Tomcat instance as a member of the balancer.ajp://127.0.0.1:8009specifies the AJP address of the instance. Therouteparameter must match thejvmRouteconfigured in the Tomcat’sserver.xmlfile.loadfactordetermines the amount of traffic directed to each instance, setting it to 1 distributes traffic evenly assuming all servers have the same resources. -
ProxyPass / balancer://spagobicluster/: This line tells Apache to forward all requests (/) to the “spagobicluster” load balancer.
[OPTIONAL] ProxyPass directives for specific SpagoBI applications:
Instead of forwarding all traffic, you can selectively forward traffic for specific SpagoBI applications:
ProxyPass /SpagoBI balancer://spagobicluster/SpagoBI
ProxyPass /SpagoBIAccessibilityEngine balancer://spagobicluster/SpagoBIAccessibilityEngine
ProxyPass /SpagoBIBirtReportEngine balancer://spagobicluster/SpagoBIBirtReportEngine
ProxyPass /SpagoBIChartEngine balancer://spagobicluster/SpagoBIChartEngine
ProxyPass /SpagoBICockpitEngine balancer://spagobicluster/SpagoBICockpitEngine
ProxyPass /SpagoBICommonJEngine balancer://spagobicluster/SpagoBICommonJEngine
ProxyPass /SpagoBIConsoleEngine balancer://spagobicluster/SpagoBIConsoleEngine
ProxyPass /SpagoBIDataMiningEngine balancer://spagobicluster/SpagoBIDataMiningEngine
ProxyPass /SpagoBIGeoEngine balancer://spagobicluster/SpagoBIGeoEngine
ProxyPass /SpagoBIGeoReportEngine balancer://spagobicluster/SpagoBIGeoReportEngine
ProxyPass /SpagoBIJasperReportEngine balancer://spagobicluster/SpagoBIJasperReportEngine
ProxyPass /SpagoBIJPivotEngine balancer://spagobicluster/SpagoBIJPivotEngine
ProxyPass /SpagoBIMobileEngine balancer://spagobicluster/SpagoBIMobileEngine
ProxyPass /SpagoBINetworkEngine balancer://spagobicluster/SpagoBINetworkEngine
ProxyPass /SpagoBIQbeEngine balancer://spagobicluster/SpagoBIQbeEngine
ProxyPass /SpagoBISocialAnalysis balancer://spagobicluster/SpagoBISocialAnalysis
ProxyPass /SpagoBITalendEngine balancer://spagobicluster/SpagoBITalendEngine
ProxyPass /SpagoBIWhatIfEngine balancer://spagobicluster/SpagoBIWhatIfEngine
Enabling the balancer-manager:
The balancer-manager provides a web interface to monitor the status of the Tomcat instances in the cluster.
Add the following to your httpd.conf or apache2.conf file:
<Location /balancer-manager>
  SetHandler balancer-manager
  AuthType Basic
  AuthName "Balancer Manager"
  AuthUserFile "/etc/httpd/conf/.htpasswd"
  Require valid-user
</Location>
This configuration requires authentication. Create a password file using htpasswd:
[ahmed@ahmed-server ~]# htpasswd -c /etc/httpd/conf/.htpasswd admin
This creates a user named “admin” with a password stored in /etc/httpd/conf/.htpasswd.
Here’s how the httpd.conf might look:
Starting httpd Daemon
After making these changes, restart the Apache HTTP Server:
[ahmed@ahmed-server ~]# service httpd restart  #On CentOS/RHEL
# or
[ahmed@ahmed-server ~]# service apache2 restart #On Debian/Ubuntu
Starting tomcat Instances
Start all Tomcat instances. The following script iterates through the port numbers and starts each instance:
for item in 8009 8019 8029 8039 8049;
do
  /opt/apache-tomcat-7.0.59-${item}/bin/start.sh
  sleep 100
done;
This script starts each Tomcat instance and introduces a delay of 100 seconds between each start. The sleep time gives each instance enough time to fully initialise before the next instance starts up.
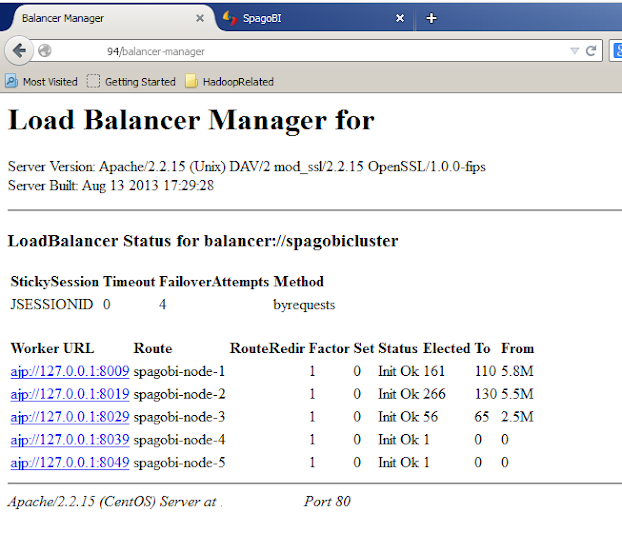
Once all instances are started, access the balancer-manager at http://your_server_ip/balancer-manager (replace your_server_ip with the actual IP address or hostname of your server). You’ll be prompted for the username and password you created earlier using htpasswd.
Here’s how the Balancer Manager might look:
This guide provides a comprehensive approach to setting up a Tomcat cluster for SpagoBI, providing a foundation for a highly available and scalable BI solution. Remember to adapt the configuration to your specific environment and security requirements.